What’s wrong with a single node Presto cluster?
In a previous post, I created a single-node Presto cluster where the coordinator and worker processes run on the same node.
That’s a bad idea in large clusters. Processing work on the coordinator can starve the coordinator process of resources and negatively impact scheduling work and monitoring query executions.
A node in a production cluster should serve as either a coordinator or worker but not both.
What’s a multi node Presto cluster?
Simply put, a multi-node Presto cluster has more than one node. Nodes can specialize as either a coordinator or worker.
In this article, I will demonstrate how to set up a multi-node Presto cluster using EC2 instances from scratch. I am aware of Amazon EMR but I have deliberately avoided managed services in the interest of learning.

We will be using 3 t3a.medium instances in AWS. These instances do not qualify for free tier.
As of 2021-Apr-08, the hourly cost of each t3a.medium instance in ap-southeast-1 is US $ 0.0472 / hour.
If you keep all 3 instances running for 3 hours, you will spend US $ 0.425 in total.
What determines a Presto node’s role?
Before we dive into the AWS console, let’s take a look at the configurations which differentiates a coordinator node from a worker node.
A node’s role is assigned in the etc/config.properties file
An example of a coordinator’s config.properties file can be found at https://github.com/frenoid/presto-configs/blob/master/production/coordinator/etc/config.properties
I have reproduced the file below. The properties unique to a coordinator are in bold. The configs bar work from being scheduled on the coordinator and turn on the node discovery service
coordinator=true
node-scheduler.include-coordinator=false
http-server.http.port=8080
query.max-memory=5GB
query.max-memory-per-node=1GB
query.max-total-memory-per-node=2GB
discovery-server.enabled=true
discovery.uri=http://{coordinator-ip-or-hostname}:8080
Contrast that with the etc/config.properties of a worker node. coordinator is set to false and node-scheduler.include-coordinator and discovery-server.enabled is omitted
coordinator=false
http-server.http.port=8080
query.max-memory=5GB
query.max-memory-per-node=1GB
query.max-total-memory-per-node=2GB
discovery.uri=http://{coordinator-ip-or-hostname}:8080
Set up the security group
Let’s begin setting up the infrastructure.
The first step is to create a security group for your EC2 instances to be launched in.
You should open all TCP ports to your IP address. You can discover your IP address at https://whatismyipaddress.com/
You should also open TCP port 8080 to all addresses to enable the service discovery process. This allows worker nodes to register with the coordinator
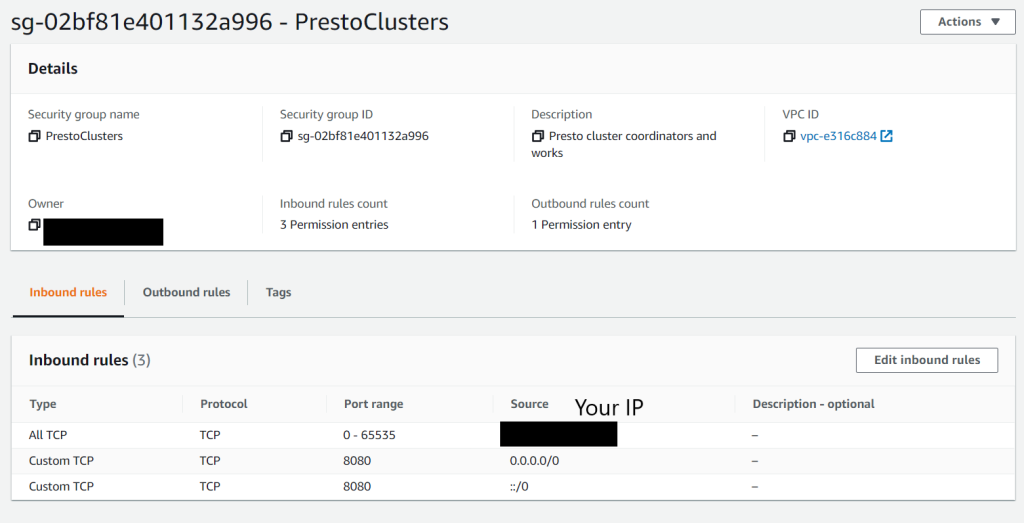
Once your security group is created, make note of its name and ID. I named minePrestoClusters (pretty self-explanatory)
Launch the EC2 instances
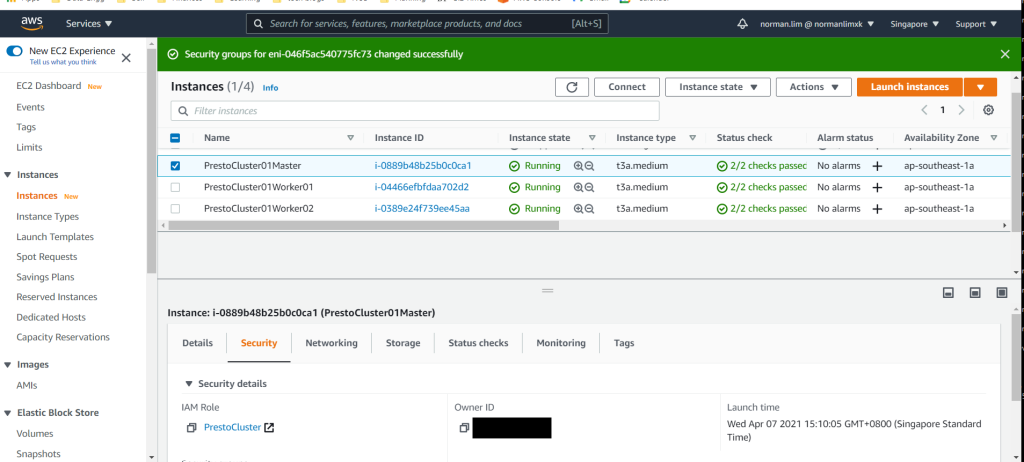
Go ahead and launch the 3 t3a.medium instances using the AWS console
You should use Amazon Linux 2 AMI (HVM), SSD Volume Type – ami-03ca998611da0fe12 (64-bit x86) / ami-07c49da39d8691810

You don’t need an IAM role and the default 8 GB of gp2 storage is sufficient.


Take care to launch the instances in security group you created before. This is vital for SSH access and for the nodes to be able to communicate with each other
In my case, I created my EC2 instances in the PrestoClusters security group

Launch your EC2 instance with a key-pair that you have access to. You will need this for SSH access
You should give your EC2 instances useful names to help in identifying coordinator and worker nodes later on
In my case, I named my clusters
- PrestoCluster01Master
- PrestoCluster01Worker01
- PrestoCluster01Worker02
Here what your AWS console will look like once you’re done launching all 3 instances
Bootstrapping the coordinator node
Before you start, you will need to know your coordinator’s public IP. You can get this from the EC2 console.
Click on your coordinator instance and look for Public IPv4 address
I will run the next steps at an accelerated pace since they have already been explained in a previous post
SSH into your coordinator node
ssh -i {your pem file} ec2-user@{coordinator-public-ip}Update yum and install Amazon Corretto
sudo yum update -y
yum install java-11-amazon-corretto.x86_64 -y
Download and unzip the jar files for Presto 330. Prepare the etc and etc/catalog directories for config files
wget https://repo.maven.apache.org/maven2/io/prestosql/presto-server/330/presto-server-330.tar.gz
tar xvzf presto-server-330.tar.gz
cd presto-server-330
mkdir etc
mkdir etc/catalog
Place the following config files files. I use vim, you can use your favourite text edior
etc/config.properties – take note to replace {coodinator-public-ip}
coordinator=true
node-scheduler.include-coordinator=false
http-server.http.port=8080
query.max-memory=5GB
query.max-memory-per-node=1GB
query.max-total-memory-per-node=2GB
discovery-server.enabled=true
discovery.uri=http://{coordinator-public-ip}:8080
etc/jvm.config
-server
-Xmx4G
-XX:+UseG1GC
-XX:G1HeapRegionSize=32M
-XX:+UseGCOverheadLimit
-XX:+ExplicitGCInvokesConcurrent
-XX:+HeapDumpOnOutOfMemoryError
-XX:+ExitOnOutOfMemoryError
-Djdk.nio.maxCachedBufferSize=2000000
-Djdk.attach.allowAttachSelf=trueetc/node.properties
node.environment=productionetc/catalog/tpch.properties
connector.name=tpch
Now go ahead start the Presto daemon on the coordinator node
./bin/launcher startIf this goes well you should see

Just to be sure, navigate to the Web UI at http://{coordinator-public-ip}:8080
Notice that there are 0 active workers

At this point your coordinator node is up and can accept queries but cannot execute them without any registered worker nodes.
Note that all the coordinator config files are also available at https://github.com/frenoid/presto-configs/tree/master/production/coordinator
Let’s proceed with setting up some worker nodes.
Bootstrapping up the worker node
You’re going to do the same things as above. Except you’ll be doing them on the 2 workers nodes.
The key difference is with the file etc/config.properties
etc/config.properties – take note to replace {coordinator-public-ip}
coordinator=false
http-server.http.port=8080
query.max-memory=5GB
query.max-memory-per-node=1GB
query.max-total-memory-per-node=2GB
discovery.uri=http://{coordinator-public-ip}:8080
Remember to start the Presto daemon on the worker node!
./bin/launcher start
Putting everything together
Navigate to the Presto WebUI available at http://{coordinator-public-ip}:8080/
If you’ve done everything right, you will see something that looks like this. Notice there are 2 active workers. These workers registered themselves with the coordinator using the discovery server.

Access the Presto cluster
At this point, you can even run queries on the Presto cluster by using the presto-cli tool for Presto 330
Download and make the CLI tool executable
wget -o presto https://repo.maven.apache.org/maven2/io/prestosql/presto-cli/330/presto-cli-330-executable.jar
chmod +x presto
Connect to the Presto cluster and run queries on the tpch catalog
presto --server {coordinator-public-ip} --catalog tpchYou can also view the table system.runtime.nodes to see the condition of nodes in the Presto cluster

Congratulations! You’ve successfully set up Presto 330 on a 3 nodes where 1 node is a coordinator and the other 2 are workers.
Cleaning up
You should go to your AWS console and stop or terminate the 3 t3a.medium Presto clusters to avoid incurring additional billing hours.

2 thoughts on “How to create a multi-node Presto cluster on AWS EC2”