
We previously created a single node and multi node Presto cluster.
In this article, we will discuss how to use a multi node Presto cluster to query data in an AWS MySQL RDS instance
We will
- Stand up an AWS MySQL RDS instance
- Load the RDS with data
- Configure the catalog file for MySQL in a multi-node Presto cluster
- Run some Presto queries on the MySQL data
But first, let’s discuss the drawbacks in the traditional way of analyzing data stored in production databases.
What’s wrong with a traditional data warehouse?

In an traditional data warehouse, before production data can be analyzed it needs to be
- extracted from the source system, usually an OLTP DB such as MySQL or PostgresSQL
- transformed through a process of data cleaning
- loaded into an OLAP system such as Oracle OLAP or Microsoft Analysis Services
This 3-step ETL process creates multiple problems
One, handling multiple systems with non-SQL interfaces into the data warehouse is complex, time-consuming and error-prone. NoSQL data sources may include object based storage, key-value stores and even event-streaming systems. Even RDBMSs use different dialects of SQL.
Two, copying data on a large scale is inherently complex. Many engineers must schedule and maintaining long-running batch jobs. If the data size is very large, you incur significant expenses using specialized infrastructure to load data into your warehouse.
The traditional data warehouse’s prohibitive cost and complexity means that much of an organization’s data is left in silos instead of being monetized.
How does Presto solve the problem?
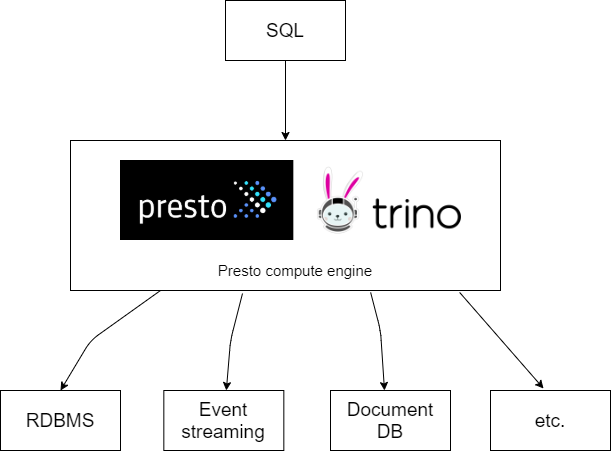
Presto presents a single SQL interface to query data in-place
Presto is ANSI SQL compliant. There is no need to write any Java or Python to query data and it also makes it easier to integrate Presto with your favourite BI tool
Presto does not store any data, it queries data in situ. There is no need to copy data from place to place. Instead, Presto makes use of connectors to query data sources. Some connectors include BigQuery, Cassandra, ElasticSearch, Hive, MySQL, Mongo, and PostgresSQL. See connectors for the full list.
Using multiple connectors on the same Presto cluster allows you to write federated queries to that read and join multiple data sources in a single query.
In this example, I will connect a a single data source to Presto: MySQL. The database will be queried as the mysql catalog
Spin up a MySQL instance
We will spin up a db.t2.micro instance which qualifies for free tier.
If your AWS account is ineligible for free tier because it is older than 12 months, you can spend about USD 0.156 for 3 hours in ap-southeast-1
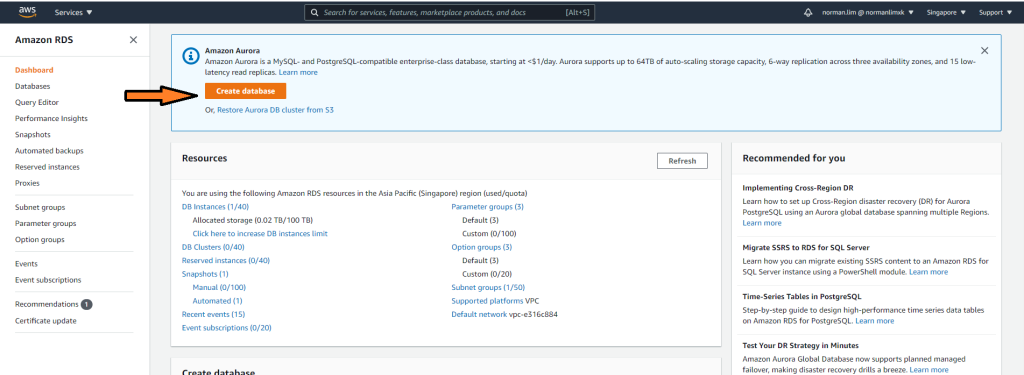
Go to your AWS console and got to the RDS homepage and click on Create database
Choose MySQL as the Engine type and MySQL 8.0.20 as the version

Pick Free Tier under Templates
You can give your DB instance any identifier you like but I named my mysql-data-source
Pick a master username and password and remember them! You will need the credentials to load data into the database and for the Presto cluster to query the MySQL instance,

Choose db.t2.micro as your DB instance class and 20 GB of General Purpose SSD storage
You can enable Storage Autoscaling but we won’t load enough data to trigger autoscaling

Site your DB in the same VPC as your multi-node Presto cluster
Allow public access since you will need SSH access from your local machine
Choose to create a new VPC security group and give it a memorable name. I called mine PrestoDataSources
Then go ahead and press Create Database

Give up to 15 minutes for your RDS to start. Once it’s ready, it should look like this

Take note of the Available status and the remember Endpoint {db-identifier}.*.{region}.rds.amazonaws.com. You will need this to connect to the database.
Now modify the PrestoDataSources security group to allow these ingresses
- All traffic from PrestoClusters security group (where your Presto Clusters are sited)
- Port 3306 from your IP address
The end result should look like this

Load data into the database
Let’s test connectivity to your MySQL instances. To do this you will need the MySQL command line client.
You can get the client as part of the MySQL Community Server distribution.
I downloaded the ZIP archive and added the binary directory to PATH

Now let’s try logging into your MySQL RDS using the CLI. You will need to replace {mysql-rds-hostname} from the RDS endpoint name
mysql -h {mysql-rds-hostname} -u admin -pEnter your password and try a query to display available databases
SHOW DATABASES;
Congrats, you have established a connection to an instance of MySQL on AWS RDS!
Now exit the MySQL session with
EXIT;Let’s load some data. We will be using test_db from https://github.com/datacharmer/test_db
According to the README.md
The original data was created by Fusheng Wang and Carlo Zaniolo at Siemens Corporate Research. The data is in XML format. http://timecenter.cs.aau.dk/software.htm
Giuseppe Maxia made the relational schema and Patrick Crews exported the data in relational format.
The database contains about 300,000 employee records with 2.8 million salary entries. The export data is 167 MB, which is not huge, but heavy enough to be non-trivial for testing.
The data was generated, and as such there are inconsistencies and subtle problems. Rather than removing them, we decided to leave the contents untouched, and use these issues as data cleaning exercises.
The size of the dataset makes this dataset useful. We can showcase Presto’s ability to handle Big Data and million row joins with ease.
First, clone the dataset to a directory of your choosing
git clone https://github.com/datacharmer/test_db.gitIf you list the directory, you can see a number of .sql files which comprise the table DDL and DML commands and .dump files which comprise the actual table data
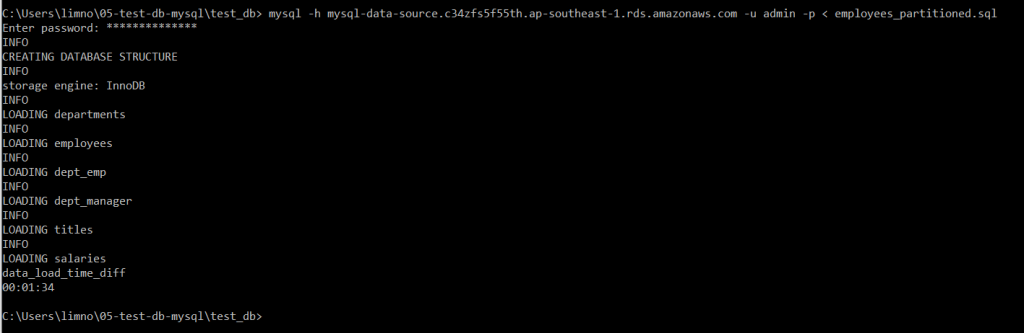
Navigate to the dataset’s directory and execute employees_partitioned.sql to create tables on the RDS then insert data from the .dump files
mysql -h {mysql-hostname} -u admin -p < employees_partitioned.sqlLoading the data may take a few minutes. MySQL will log the progress out to console
Log back into MySQL and run a few commands to inspect the data
Check out the images below to obtain the SQL commands

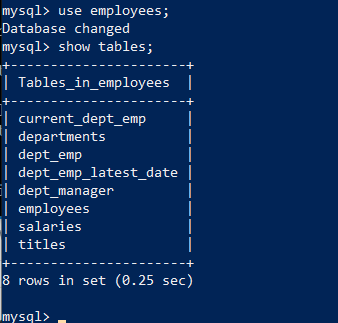
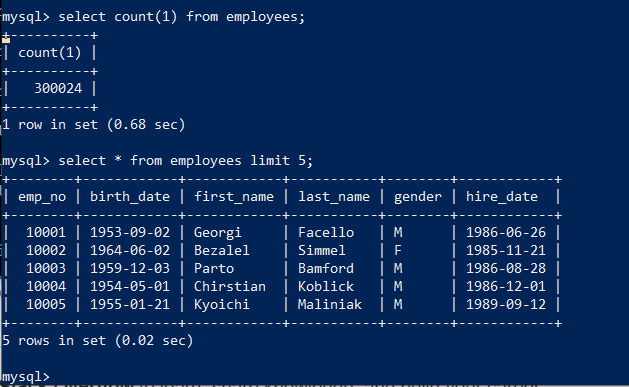
Congratulations! You’ve successfully loaded your MySQL RDS with data
Configure the MySQL Presto catalog
In this section we will configure our multi-node Presto cluster to access our MySQL RDS as a catalog.
I assume you already a multi-node Presto cluster running on EC2. If not – follow this guide to create one
Recall that you added the etc/catalog/tpch.properties file to enable Presto to query the tpch catalog
Every data source needs it’s own etc/catalog/*.properties catalog file. This file gives instructions and credentials for Presto to access the data source.
Let’s learn about the catalog file for mysql: etc/catalog/mysql.properties
connector.name=mysql
connection-url=jdbc:mysql://{hostname}:3306
connection-user=admin
connection-password={snipped}- The connector.name is mysql which tells Presto to use the built-in MySQL RDBMS connector
- The connection-url gives endpoint of your MySQL instance. Replace {hostname} with your AWS MySQL RDS hostname
- connection-user is your RDS username. It’s admin if you followed my instructions
- connection-password is the password association with your RDS username. Replace {snipped} your RDS password
You will need to place the file etc/catalog/mysql.properties on ALL your Presto nodes – coordinator and worker. This allows any Presto node to query your MySQL instance
If you followed my previous guide, you will have 3 EC2 instances in stopped state
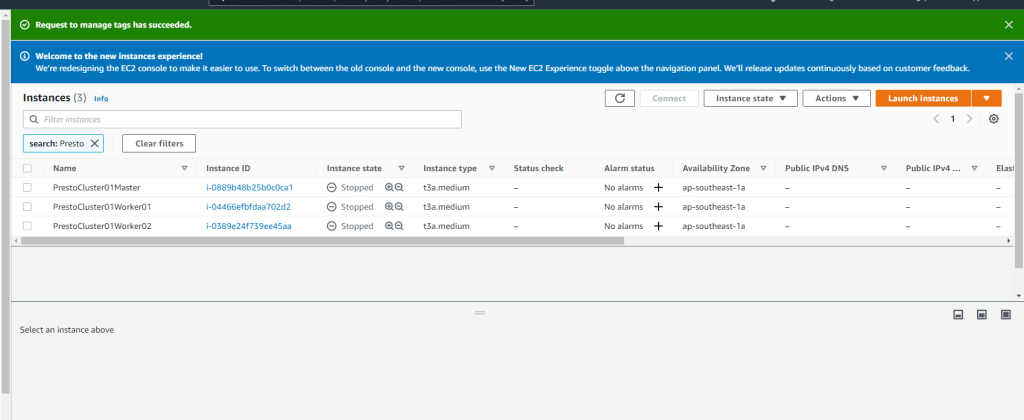
Start all 3 instances and wait for them to enter running state.
Then copy down the public IP address of the master node and the 2 workers. The public IP will not the same as prior to shutdown unless you attached an Elastic IP to the EC2 instances
SSH into all 3 nodes using each of their and create the etc/catalog/mysql.properties file using your favourite text editor. I use VIM.
In each node, you will also have to change discovery.uri in etc/config.properties to use the new public IP of the master node
Once that’s done, start the Presto service in each node as root
sudo su
bin/launcher start
Access your Presto clusterUI at http://{coordinator-public-ip}:8080
If you see 2 Active Workers as below – then you’re good! Otherwise, re-check that all 3 of your nodes have the discovery.uri property in etc/config.properties updated with the coordinator public IP

Run some queries!
Finally, we get to the fun part! We’re going to run some queries on our mysql catalog and even perform a million row join!
Download the Presto cli jar and make it executable. Instructions here
Connect to your Presto cluster like so
./presto --server {coordinator-public-ip}:8080Use presto-cli to display the catalogs available to Presto
SHOW CATALOGS;
Let’s explore the schemas available in the mysql catalog
SHOW SCHEMAS FROM mysql;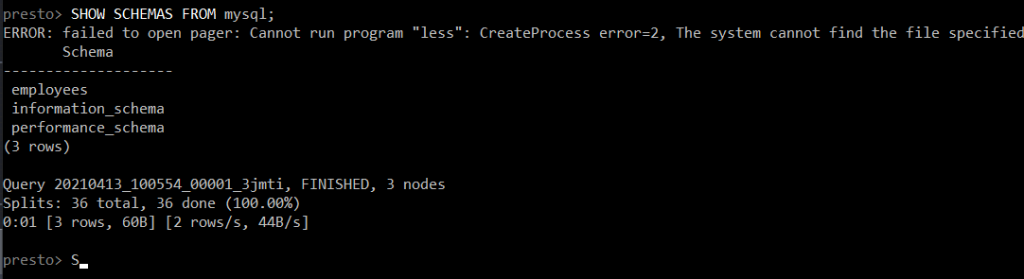
Notice they are the same 3 databases in your MySQL RDS
Finally, let’s find out what tables are available in mysql.employees
SHOW TABLES FROM mysql.employees;
Let’s examine the structure of 2 tables mysql.employees.employees and mysql.employees.salaries
DESCRIBE mysql.employees.employees;
DESCRIBE mysql.employees.salaries;
So we have 2 tables: one table of employee personal information such as their name, gender and birthday and another table of employee salaries at different points of time.
What if we wanted see an employee’s personal information and alongside his/her salaries at various points in time?
Then we we would write a JOIN query
SELECT e.*, s.salary, s.from_date, s.to_date
FROM mysql.employees.employees as e
LEFT JOIN mysql.employees.salaries AS s ON e.emp_no = s.emp_no;
The is SQL. query involving LEFT JOIN between 2 tables where emp_no is the join key
Now watch Presto execute the query in the UI!

The query joins about 300K rows in mysql.employees.employees to 2.84M rows in mysql.employees.salaries to produce an output of 2.84M rows.
You can view the query plan by clicking on the Query ID in the UI the clicking on Live View.
I will not be deep diving into Presto query plans in this article. Presto query plans deserve a series of articles to do it justice.


Here’s what the results look like in the presto-cli client

A query does not complete until the client fetches all the results. A Presto query can be slowed down if the network between the Presto coordinator and the client is slow.
An additional fun fact, if you examine the query performance in detail, you can see which Presto nodes executed certain Tasks

Cleaning up
You should now shutdown all 3 EC2 instances running the Presto daemon and stop your MySQL RDS instance to avoid additional charges

Congratulations! You’ve successfully connected Presto to a MySQL instance running in AWS RDS, queried the data in-place and performed a million-row join
That’s an example of Big Data in action!

One thought on “How to use Presto to query an AWS MySQL RDS instance”